Wednesday, May 18, 2011

Ready to Start Creating Again!

I want to apologize for my lack of posting for the last month or so.  I became very ill with bronchitis, and was down for a couple of weeks.  Then I have been swamped with graduations, baby-sitting for busy family, painting faces at end of school year picnics.  Just a whirlwind of activity.  It was fun, but I didn't have much time for crafting.  My dog, Lou-Lou offered to help, but I don't trust her spelling abilities!

Yellow crochet, with can tabs, and crochet flowers attached.  There are little silver bead-like bells attached to the bottom edge.   The flowers are from a tutorial off ofAttic 24  I just love Lucy's blog.  She is located in England, and has many cute crochet tutorials, and beautiful pictures of scenery around where she lives, and has taken trips to.  She's just a really sweet lady.
I have been experimenting with my beverage can tabs, and I think I have come up with some pretty cute necklaces.  I made each of  the moms, on Mother's Day, a different colored one.  I am glad I finally got brave enough to try crocheting with beads.  It really enhances the crochet, and it's super easy.  I can't believe I was so intimidated by it. 

My camera isn't showing color very truly,  This is a pretty sage green, with flowers and beads.


This is an all black, with black beads on the bottom edge. 


I also decorated some hats.  I was making flowers for some headbands and brooches, and I had some extra flowers I had made, and I remembered that I had four blue-jean hats I had bought on clearance for twenty-five cents each. I got them out, and started decorating them with lace, and yo-yos, and flowers, and I think they turned out pretty cute.  Not bad for a total cost of about fifty cents each!  My granddaughters were over and they saw them and wanted one, so they each choose one, and that left one for grandma.  I go to a lot of baseball games to see my grand kids play, it will come in handy to keep the sun out of my eyes.

This one has a pull tab flower I crochet on the front.  I found this flower tutorial on Escama Studios.  I just love it.  It's fairly easy too.

Sunday, April 10, 2011

Heartfelt Plea! Please Read!

First, I would like to say please bear with me, I haven't posted at my usual times this last week, and I should have posted and told everyone what I was up to at least.  I am rearranging almost my entire house.  We moved in here four years ago, and had a large addition built on.  Shortly thereafter my daughter and her three girls were in an awful car wreck, and had to stay with us for about six months so I could care for them.  So, we set up hospital beds in our new addition, and made it into a care facility for our family in need.  When they got better, and they did recover wonderfully, thanks to God's blessings, we just kind of moved hospital beds, and wheel chairs out and stuck furniture in the room.  I never did really think about how I wanted to arrange it, or what I really wanted the purpose of the four added rooms to be.  So now I am switching rooms for better function, and trying to think what style I really want them decorated in, and to top it off, I am combining two craft rooms into one more streamlined, efficient one.  So...needless to say, I am super busy. I will be able to do so much more crafting when this is all settled.  It should only take about another week.  Please bear with me.  I love all my friends who read my blog, and wouldn't want to loose one.  In the Meantime, before I close, I feel like God has put something on my heart I have to say.  I know this is a crafting blog, but I am a Christian first, and I have to follow what God would have me do.  So please read on:

I absolutely love children.  I am a Superhero defender of children, and something has come to my attention that I feel needs to be said.  So many times I sit back and watch children interacting with their parents in malls, at the park, at family gatherings, and so on, and sometimes it's all I can do to keep from crying.  In this busy world we live in, sometimes I think we come to take them for granted.  God has given us these precious gifts to cherish, teach, instruct, and influence, and while we all love our children, I don't think we remember to treat them like people.  I have seen mothers sitting and talking in groups while their children play at family gatherings, and I know children shouldn't interrupt adults, sometimes that's the only way they can get a word in!  I have seen a small child stand patiently for five to ten  minutes with his hand on his mom's knee waiting to tell her something or ask for help, and then he would begin to say, Mom.....Mom.....MOM!  The mother turns and yells right in his face WHAT DO YOU WANT???  The look on the little child's face makes me want to cry.  Just stop and think for a minute, how would you feel if someone screamed at you like that when you needed their attention for a moment?  It's so demeaning.  We are supposed to be their protectors, and make them feel loved, and secure.  We tend to not think of our children as people with feelings, they are "Just kids".  But they do have feelings, and we need to remember that they don't even have the life experience that we have had to draw upon to solve their emotional problems.  No one means more to them than we do, and we can break their little hearts very easily.  Simply saying to the person to whom you are conversing with, "Excuse me just a moment, please hold that thought, my child needs my attention for just a moment," would be so much easier on both you and your child.  Even with teenagers, while they may not admit our approval is important at this stage of their life, to most, rejection of any kind really hurts them too.  

I have also witnessed parents making fun of their child for being sensitive, like crying easily, or getting their feelings easily hurt, or being crabby.  Sometimes people just have days where they are sensitive or crabby. In this day and time tenderness and sensitivity should be treasured.  So many people have become hardened their attitude towards life and others  Adults "get up on the wrong side of the bed" sometimes, and we usually justify our ill behavior, or sensitivity to some occurrence in our life giving us the right to behave badly.
But you know, if we are adults and can't always control our behavior, how can we expect more of these little ones?  We often times expect more emotional stability and strength from out children than we do from ourselves and other adults in our life.  I don't want to seem to lecture, and I am not pointing the finger at anyone, I am just asking, take a moment to think before you react to  situations with your children, and ask your self " How would I feel if someone talked to me the way I am getting ready to talk to my child?"  I have made the mistake myself, and their little sad face will come back to my mind later, and I am ashamed of how I treated them.  We never know how long we will have with our loved ones, I have lost many loved ones over the years, let's try not to hurt the ones we treasure the most.  This advice could go for interacting with adults too.  Always ask yourself, "How would I feel if someone said the same thing to me, or treated me this way?" before you react thoughtlessly. 

I hope I haven't hurt anyone's feelings, or offended anyone, I just felt like it needed to be said.  We are all trying to rush around and get through our busy day's work, and we don't slow down to think about people and how we are treating them, we just get annoyed if they get in our way.  Let's take a moment, once in a while, and analyze how we seem to others.  What are we projecting to others with our behavior?  Thanks for listening!  Love to you all!

Monday, March 28, 2011

Lamp from a Creamer Container

One more flower pin.  I am so proud of her!  Not bad for an eleven year old.
A flower pin.
A Three Finger Ring
This is a purse she designed and sewed all by herself, with a flower pin she made her self.
Maddy is quite a little crafter, this scarf is another item she has made.
This is what it looked like painted, and open, ready to wire and pour the pebbles in.
Granddad helped her do the wiring.
I used a soldering iron to burn the holes in the top and down at the bottom for the cord.Then Maddy weighted the bottom down with some pebbles she poured inside.
Her Granddad picked up a light kit for her.
This is my beautiful granddaughter who is the genius behind this project.  We were sitting at the dinner table and we had an empty creamer container, and she was looking at it and said this would make a cute lamp!  I had her use some plastic paints and some zebra duct tape to decorate it. 


This is the finished lamp, she is going to use it in her bedroom.  We are still going to work on that shade, I think we will recover it with some zebra print fabric.

Sunday, March 27, 2011

Repurposing a Beloved Skirt

Then I made a sweet little headband to match it.
The finished product!  I attached the ruffle to the bottom, again a two inch x the circumference, of the skirt+2/3-3/4 of the circumference measurement, depending on how fully you want it gathered.  Mine was about 60inches.
I then made two roses, each from a strip of a fabric 1 inch x 12 inches.  I rolled them and stitched them as I went and sewed them on.
To further embellish the skirt, I gathered a 1 1/2 inch x 12 inch piece of netting and sewed that to the middle, front of the top ruffle.
I pulled the bobbin threads up and fitted and pinned the ruffle to the skirt, and used a zigzag stitch to attach the ruffle.
For the ruffle, I cut a two inch strip the measurement of the skirt around, plus about 3/4 of that length added.  Mine was 45 inches long. I set my sewing machine to a long basting stitch, and stitched up the middle of the ruffle to gather it.
Jean Skirt After I had applied one ruffle.   I should have taken a picture of the skirt with nothing on it; But it didn't occur to me to use it for a blog project until I got this far.  You can see the diagonal seam remaining, the top one was the same, and they continue around the back too.     
Simplicity #2238
You will have to look at the pictures from the bottom up, because I cannot get my picture to reverse the order in my posts.  I have tried and I have given up.  This is a skirt my eleven year old granddaughter brought to me.  She asked me if I could add a little something to the bottom to make it a little longer, because it still fit around, but it was a little too short.  It's one of her favorites, so I thought I would try.  Yellow is her very favorite color, so, being that I can't just do one thing to anything, I proceeded to update and embellish it a bit!  If You would like to do this to a skirt of your own, and it didn't already have diagonal seams, You could just mark and draw some guides onto it for your self and create the same look.  I have a picture above of a darling pattern I picked up at the store last week.  I think the little top, pants, dress and skirt are decorated cute on the pattern, but you could also easily disregard the patterns embellishments and add some of your own creativity.  I also made her a little headband to match, she has very long, straight hair, so it should look really cute.  I may be able to talk her into modeling it all for me, and let me take some pictures, but she is pretty camera shy.  If I get one, I will post it.  Wish me luck!

Monday, March 21, 2011

Gone Too Far?

Sometimes I wonder if I go too far.  Do you ever feel that way?  I get an idea for something, and I will sketch the idea up and it looks appealing and then I start finding the supplies I need, and begin to assemble the project, and that's usually where my idea either comes together beautifully, without any hesitation, or, it turns a weird corner and goes awry.  That's when I think, "Should I waste the time finishing this?  Or, should I scrap it now?"  It's so hard to decide.  I felt like this about this project.  I started off making the round centerpiece as a pin.  I thought it was a somewhat pretty pin, and my daughter saw it and said she loved it and so I decided I would make it into a necklace for her.  Then I started adding parts to it, and making the necklace, and now I am afraid to give it to her, I think I went to far!  I don't have a lot of confidence in my creations anyway, that is one of the reasons I started a blog.  It is a lot easier to show someone your design and not have to be face to face.

So, I am asking for some comments.  If you don't like it, I won't blame you, I made it and I'm not sure if I even like it!  I am thinking of cutting everything off it except the little center circle pin that I started off with.  Decisions...Decisions...

Wednesday, March 16, 2011

Turtleneck to Shrug

detail of ribbon and flowers
Back view
Front of shrug
This is my little two-year- old princess, who refuses to model lately. 
This week I decided to tackle some turtlenecks that I got at an end of the season sale, a few weeks ago, for twenty-five cents each.  I wouldn't want something I have so much invested in to be forgotten, and not used!  I had went to "Cut out and Keep" to this this link: http://www.cutoutandkeep.net/projects/tshirt_shrug# and found out how to make a shrug from a T shirt, and cut off the neck and cut down the middle of the front, like the tutorial suggests.  The only thing that I changed is:  When you go around your corner up at the neck area, I rounded the corner, rather than leaving it squared off.  It was too hard to fold the inch over to make the casing for your ribbon, in that area.  There was too much fabric and too much bulk for me to make a smooth turn.  So I just rounded my corners off, then all went smoothly. I also added a 2 inch ruffle to the bottom, and neck area.  I  measured the bottom of the shirt and made the ruffle 2"  wide by the measurement of the bottom, plus one half that length added to it.  So, if your bottom measurement is 24 inches, then it would be:      24 + 12 =36 inches long.  I ran two rows of basting stitches down the ruffle, then found and marked the center.  I started pinning it to the bottom of the shirt, wrong sides together, easing in the ruffles to fit.  Make sure you stop with the tapered end of the ruffle before your casing for ribbon, or you won't be able to put your ribbon through.  Next, stitch the ruffle on. I pressed the seam allowance toward the top of the garment, and then top stitched  about 1/8 from seam to make the ruffle lay nicer.  Repeat the same for neck ruffle, but make sure you stitch it on below your sewing line for the casing, as not to interfere with it.  Feed your ribbon through, tie a bow and adjust your gathers.   I added some flowers near the neck area.   Mine is a size two for the cutest little princess you've ever seen, but...she has decided, lately, that she does not like to model clothes, nor have gram take her picture!  So even though it looks much cuter on an adorable two year old, how can you argue with a princess??   My daughter ( otherwise known as the princess's mother), makes all of her adorable hair decorations, and she has some beautiful ones.

Wednesday, March 9, 2011

I'm Hung up on Necklaces

                                      I think I am addicted to making necklaces, jewelry in general.  I am loving playing with the paperclips and tape,  I am mad at my camera, though!  I can not get it to take pictures true to color.  My background on the zebra is a soft pink, and I am getting peachy.  It looks like I have a sepia tone overcasting it.  I've tried all kinds of lighting, nothing works!  I need a new one, but funds are not allowing it right now.  I am also having problems with the date on my pictures.  My camera is putting bizarre dates, going all the way back to 2006 on my pictures!  I keep resetting it, but it puts the wrong date almost every time!  Anyway, enough complaining.  I have been pretty busy lately, and haven't had time for many projects, but I have sneaked in a couple pieces of jewelry late at night.  I thought about calling my jewelry creations
"Midnight Oil Designs", because it seems most of my work is done in the wee hours of the morning, after midnight, "Burning the midnight oil".  I love blue and white together, I love birds, and when I was these cute blue and white china birds, I knew I had to create something with them.  I would like to mention someone  who commented on my last post and mention her blog.  It is Debbie, from Simply Debbie, and she is the sweetest lady. Her blog is a praying blog, and it is such a wonderful, God filled blog.  I really enjoyed it.  If any of you get a chance, check it out.  Well, I guess that's about all I have for now.  Hopefully, I will have something a little bit more interesting soon.  I am trying to get my lovely daughter who paints beautiful murals and designs great rooms to let me feature her on my blog.  I will try to get her on this week.  Happy crafting, and I hope you all have a great week.
Paperclip and Sequins
China Bird Earrings

Another Paperclip Design

3 Strand Bracelet tied together with a bit of lace.
2 Strand Bird Necklace

Monday, February 28, 2011

Personalizing Paper Projects
Purple, "Get Well"
Flowers made into an arrangement, along with origami vase
Black and White Patterns, and Purple "Cheer"
Black Checks placed on tan paper for a more manly look
Another style of origami flower
Origami Pocket, with windowpane check flowers,can be hung on wall.
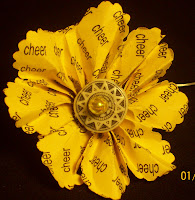
"Cheer" Flower
Flowers, Origami vase
"It's a Boy", "Its's a Girl"
"Love"


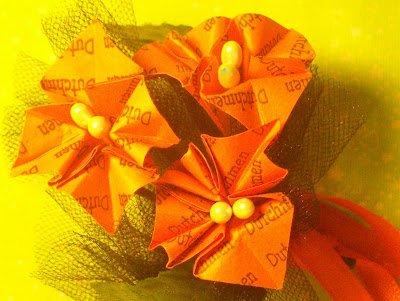
This is an origami flower, I made for our school, I am designing these little corsages to be sold at the football games with a portion of the profits to go to the school.  Our school colors are black and orange, and are called the "Dutchmen".  If you notice, the school logo is on the flowers.  I like this idea, and am using it on other projects, as well. For those of you who make paper flowers, think of the possibilities!  You could put a sentiment on them, personalize with a person's name, Express affection by printing "Love you" on them, Print "baby"  for a shower decoration, the possibilities are limitless.  I am really excited about this!  It doesn't have to stop with flowers, either.  On any small paper project that can fit through your printer can be done this way.You could personalize wrapping paper for small gifts, handmade envelopes, cards, anything.  I simply go into photoshop and pick the watermark for my background, on mine you can choose if you want it straight, or at a chosen angle, how close together you want the words, size, color of font, and etc.  You are only limited by your imagination.  I also use background designs and print my own graphics to personalize my items, say, like my granddaughter likes zebra print, if I can't find paper I like, I just print my own, and then make the flowers for her from that.  I've added various other pictures, sorry they aren't in a very nice layout, I can't seem to get my pictures to line up where and in the order I want them in my posts, so I just fight with them a little and then let them decide where they want to sit (kind of like kids in a car fighting over who sits where, or at the table...sound familiar?!).  This isn't the idea of the century, it's just a simple little thought that might make your flowers and pennants, and other paper items more personal, or themed in a way you would like.

Thursday, February 24, 2011

Finally Found a Home for my Earring!


I don't know if any of you have memories like this, but when I was a little girl, there was nothing I loved to do more than go through my mom's jewelry box and look at all her jewelry.  She had a lot of old pieces that had sentimental value, and new ones too.  I felt like it was a treasure.  A few years ago when my mom passed, I inherited her jewelry boxes, and all the treasures within.  There was a single, screw on earring in there that always caught my eye, It had been my grandmother's, and my mom kept it for sentimental reasons, because her mom had passed on when I was only five, in 1961, so this earring is probably older than I am.  It is the swirly piece in the center of the flower in the above pictures.  It is so detailed in person, and delicate in color, I just loved it.  I took it off the earring back, and was looking for just the right beads to accompany it into a necklace.  It had lived in that jewelry box for years and I wanted to be able to wear it and show off Grandma's  earring the way it should be.  My daughter gave me the shell flower pendant along with other beads for my birthday, and then I got some of the other beads off an old necklace I took apart, and all of a sudden, an idea came to me that these very beads would be the ones worthy of creating a necklace for this lovely earring piece, so I began constructing it.  It is an unusual color combination, but I love it.   Now I have a necklace to wear that reminds me of my  mom and Gram .  I think if they could see it, they would approve and be glad it was being put to good use.